INTRODUCTION.
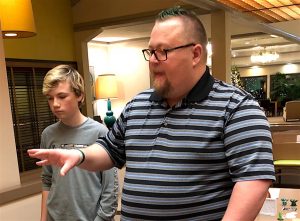
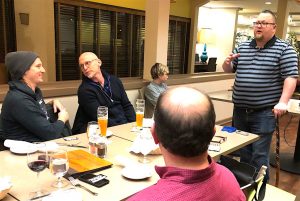
Ron Triplett, owner of iPrint3D Studio, presented a Tech Talk on 3D Printing. Formerly a Regional Manager with Radio Shack, and a tinkerer at heart, Ron brings to 3D Printing an excellent background for this hot new technology that’s been progressing to the current, popular-enough-for-mainstream-press stage since the mid-70s. As a subset of Additive Manufacturing (AM), 3D Printing focuses on the polymer technologies and is popular among hobbyists, with gaming enthusiasts leading the way to a wider market.
NOTE: The following wrapUp is primarily transcribed narrative from Ron, captured during his Tech Talk on December 5, 2019. Some minor changes—a word or phrase here and there—were made to translate conversational to narrative format, or to clarify a concept. Enjoy!
AND BEGIN…
After a brief introduction to his bona fides, Ron began his presentation by explaining that the current interest in 3D printing is heightened by newly-released patent information and government restrictions being lifted [resulting in legally-sharable technology; a.k.a. freeware], along with news of recent innovations in almost every field imaginable.
Additionally, the technology for designing the software has become a lot easier and more streamlined; that means that 3D Printing has become a craft—or business—that anybody is able to get into relatively inexpensively.
Decent entry-level 3D Printers cost as little as $300.00; this is a great printer, even for a 3D Printing business. iPrint 3D Studio uses a Creality Ender Pro Printer; good overall printer, easy-to-use, access to free things to download and you can repair the printer parts by 3D printing the parts. Literally, a reproducing technology!
TWO TYPES OF 3D PRINTERS
There are two main kinds of printers; your project will dictate the kind of printer to choose. The two categories are: FDM (Fused Deposition Modeling) and Resin Printing.
FUSED DEPOSITION MODELING
With FDM, you are starting with the filament [“cord” on a spool]; i.e., 1.5 mm. PolyLactic Acid (PLA) plastic, a bio-degradable plastic that is extremely easy to print with, durable, takes paint very well, and it’s very inexpensive. With this type of printer, you could print 100 cell phone cases for $25.00. Cheaper filaments can cause jamming and/or warping.
To use FDM, you take a model and run it through a [free] slicer; a program that is used to 3D print. The slicing software takes a model and slices it into layers [like what an MRI does], based on your printer settings. Then the software has a G Code [CNC programming language term; General Code] that is built-into the slicing software that sends the information to the printer to let the printer know exactly where to go.
BEGIN PRINTING
Here’s how easy it is for a beginner to print…
You can go to a website called ThingiVerse which offers over a million 3D resources—or things—for free. You can navigate to that website, find what you want to print, download the file, transfer that design file to your slicer, click prepare, click print, put it in your printer and walk away while the job is printing.
It’s not much more complicated to print on your 3D printer than it is to print on a standard computer [inkjet, laser, impact] printer.
There are things you can do to customize it in the slicing software but if you don’t want to go into anything technical, you can go with the standard settings and come out with really good quality prints very easily. They have small children—as young as six-years-old—who put out really great 3D printed objects, as well as retired people who think they are too old to start with a new technology.
RESIN PRINTING
With Resin Printing, instead of the printer pushing out a filament, you’re using resin [like what you might use to fiberglass a speedboat, to waterproof it.]
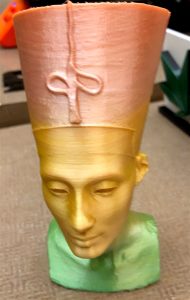
You begin with a vat of resin in liquid form in the bottom of the print bed. It lowers the print bed down into the vat of liquid and shines lights in a certain configuration and then literally pulls your print out of the vat of liquid. Amazing detail! The result is called a Lithophane. But it’s not an easy print with resin as it is with filament—and it’s an investment. And then there’s the maintenance; if you’re not printing anything for a day or two, you must go through a shutdown process so the resin does not cure inside the print bed.
Also: The material is a toxic material. You have to wear special gloves and you have to go through a 3-part bath and cure it before it’s safe to handle. That said, if you have a need for a resin object, it’s fantastic on the kind of quality prints you’re able to do. We use it a lot for gamers. We’ve got a lot of gamers businesses that have us print things for them to sell in their stores because we can come up with a really good quality item that’s customized to the customer’s specifications and then print that item.
TYPES OF RESIN PRINTERS
There are two different kinds of Resin Printers, when it comes to 3D printing: One is DLP (Direct Light Processing) and the other is SLA (StereoLithography). The difference between them is: SLA is the best quality you can get when it comes to resin printing; it takes lasers and shoots those lasers at the resin in certain configurations to cure the resin at the exact point where it needs to be cured, and then raises the object out of the bed.
DLP, which is the option we’ve chosen to go with for our business, is slightly less accurate from a consistency standpoint, to the point where you can’t really notice the difference. For us, it didn’t make sense to invest in the SLA style, when you don’t notice the difference, and it’s incredibly fast at printing. It doesn’t matter if you’re printing one item or 10 items, it prints at the exact same speed. You can print 10 items as fast as you can print one because, on the bed, when you’re putting all the objects on the bed, the printer is shining the light to cure all the items at the same time, as it’s pulling it out. Versus the laser is focused on one spot. The items are spread around the print bed on a tray and the bed rises from the liquid.
Both versions are great options for 3D printing, and they’re both very good at what they’re able to accomplish but whatever your business or hobby, is the determining factor in selecting the version; a Resin Printer or a FDM Standard Printer.
We always recommend FDM if you’re starting out. The reason is: if you’re not going to be printing for a while, you turn off the machine and walk away for an extended period of time and, when you need to print again, you simply load the filament and turn on the machine and you’re printing again. There is no effort to it. Very, very simple.
PRACTICAL USES FOR 3D PRINTING
Now for the practical uses to it. We found, over the time that we’ve been in the 3D Printing World, that there are so many people already 3D printing that it is already all over the Rogue Valley. People are not out there talking about it because there are still a lot of people who have confusion around it. We get people coming into our shop simply to learn how to use their printers better, better recommendations on the kind of filaments to use, great resources… They also need custom prints. In fact, our original idea was to have examples of 3D printed objects around the store, but we found out that there are so many custom needs that we can’t stock our store. So people who own 3D printers print things, bring them into the store, sell them, we split the commission. So now we have so many people who have a side gigs, and they’re using the proceeds from their cut of the commission to fund filament and other supplies for their hobbies.
3D PRINTING MATERIALS: PLA | PETG | ABS
The kinds of materials you can use include: PLA (PolyLactic Acid) but there are other materials you can use in these printers. For example: PETG (similar to the material used in milk jugs; very sturdy); this doesn’t take any extra work to print it than PLA but it does take a little bit higher heat on the nozzle in order to do it, which involves adjusting the settings. The slicing software is doing all the work for you; simply click to declare the material being used.
Another material is ABS, which is used in plumbing works; very difficult to print with this material, and it’s not something we like to recommend unless you’ve had a bit of experience in printing with this material. And, you need a controlled environment. If you were to print an object using ABS right now, in this open-air environment, it would fail; that’s because there’s too much air flow in this particular environment. You’d need something like a photo booth that can sit over the top of the process, like a cardboard box—or even a plastic bag; something to control the heat. The reason people elect to print with ABS is: it’s a very strong, durable material that can hold up to outside weather conditions very well but it depends on what you’re trying to accomplish. We always recommend that people start with the basics and work their way up to the more complex materials.
But it doesn’t stop there…
HYBRID MATERIALS
There are also hybrid materials. Hybrid materials means it’s usually 70% PLA | 30% other material.
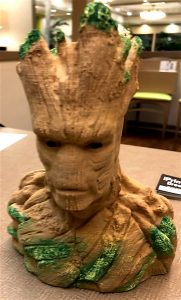
Ron passed around an object that is crafted from 70% PLA | 30% wood. When the materials combine, the wood is what you see. You can sand it or stain it, like you would sand or stain a wood object.
PRINTING WITH COPPER | CARBON FIBER | STAINLESS STEEL
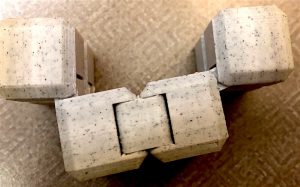
You can do the same thing with copper, carbon fiber, stainless steel. For example, copper: If you print in copper, you can polish it, age it, patina it, rust it like you normally would with all copper. It’s pretty amazing that you can get the kind of look and effect you’re looking for. Ron passed around an object fabricated from PLA & copper that had been printed in the desktop printer he was demonstrating this evening.
There’s also carbon fiber, which can add a bit of rigidity because it’s chopped-up and you’d be able to print into it. There are a lot of different choices. Ron demonstrated some objects that had been printed with different materials: hemp-infused (smells like corn on the cob being grilled); natural coffee and coffee byproducts (gives the object a unique color and smells really good); and conductive filament (currently in the experimental phase; you can use this to 3D print a circuit board and then pop your electronic components into the finished PCB).
COSPLAY OBJECTS
We get people coming into our store looking for CosPlay objects; CosPlay is where people dress up in costumes that they want to be able to light-up and put motors in them. I can 3D print the components directly into whatever item—helmet, glove, whatever—and pop the LEDs into them, add a battery and it will fire-up because I’ve built all the electronic circuits directly into the print itself, using a standard printer. Very exciting!
USING MULTIPLE FILAMENTS
We now have the ability, through a machine called the Palette 2, to print four different kinds of filaments or materials at the exact same time through the extruder, which opens-up the 3D Printing World. What that means, when we’re talking about a circuit, is that you can 3D print your board and your circuit all at the same time. [Wow!]
The other thing that means is: If you’re looking for supports—you may be printing something that has a big overhang—you have to print supports and those supports pop-off. With a unit like the one Ron was demonstrating, you can print it with water-soluble supports, drop it into some water to melt-away the supports, and you’ve got your item. Awesome!
3D PRINTING JEWELRY
Earlier, we talked about jewelry making. Jewelry printing is a big thing in the 3D Printing World. A lot of people love to be able to use it because you’re able to get a variety of designs that you are unable to get through previous methods. The versatility of designing in a 3D model and printing opens it up to lots of different options. From there, you can either cast your jewelry or you can spray paint it in a graphite material and then electroplate it to achieve a coated object.
Q: Does this process bypass the traditional lost-wax process used in fine jewelry making?
Ron: You have a choice when you 3D print jewelry: you can use lost wax or skip that process and print directly; you can actually 3D print in wax, you can print in TPE (ThermoPlastic Elastomer) or TPU (Thermoplastic PolyUrethane; basically rubber). You’re able to make watch bands. If you use TPU, you can actually print the watch band and the clasp at the exact same time, if you want to.
3D PRINTING REPLACEMENT CAR PARTS
Earlier, we talked about car parts. We actually print a lot of car parts in our studio because there are a lot of people who remodel vehicles for trade shows. We have people who do car stereo installations and other restorations, and parts for older cars are hard to find. We are able to go through, re-engineer the part, print it, and the owner can put it into place. But we can’t do anything that is adjacent to the heat of the engine.
We had a customer with a 1952 Chevy who was placing the vehicle into a car show and planning to remodel it to sell it. You can’t find the four fin lights for that year/make. He called all over and finally found one place in Eugene that had one in worse condition than the one he had, and the seller wanted $250-$300 for the set. We were able to take his broken model and recreate it. He popped it into place, installed the lights and it worked beautifully! Then he changed his mind and wanted to upgrade it to modern LED lights to make it more efficient and brighter. We edited the model and he popped it into place, added the LED lights and it worked beautifully!
Q: What did you use for filament on the Chevy Tail Lights?
Ron: I believe we used PETG on that project, because PETG has a little bit of flex to it.
We do a lot of replacement parts. Many people have broken or lost parts they can’t get from any other avenue. The sky’s the limit! BTW, we also operate under NDAs as requested.
3D PRINTING PROTOTYPES
One project we did that did not require an NDA involved working with a local physicist who has a contract with the U.S. Navy to develop high-altitude missiles. We are actually designing and printing the models he’s using for testing in wind tunnels. We’ll be able to put the electronics in and be able to fly them!
Someone else had a broken card shuffling machine from the 1980s, and we were able to go through and engineer that. Someone else had an Atari Game Paddle. Before Atari 2600 when Atari only produced 200 of them, and the paddles were all broken; that’s why they didn’t continue to play with them. We were able to re-design the paddle broken piece and print it for them and they were able to start playing with those. Record needle parts; you can’t find record needle parts anymore. Really, anything you can’t get parts for anymore, you have the ability, with a 3D Printer, to manufacture those items.
CREATING THE OBJECT
Q: That’s what I’m interested in hearing about: How do you actually create the object?
Ron: There’s a lot of great software out there. On the back of the business card I passed out, there is a URL for a website [ThingiVerse.com] that offers over a million things—for free—that provide solutions for 3D printing: 3D designing software and other offerings. If you’re in startup mode, we recommend TinkerCad, a web-based designing software that’s very simple to use. We have six-year-olds who are using this product to design their models which are used as a basis for their final printed products. But TinkerCad is also powerful enough for experienced designers. The best feature is: the product is made by AutoDesk, a very well-known CAD designing tool, and TinkerCad can actually send it to most of their other software products. So I can start with a foundation in a simple program like TinkerCad and then send it into Fusion 360 and then further edit the model for use with higher-end tools. What I like about that is: it cuts down the design time to a fraction of what it might take otherwise and if there’s an easier or more efficient way to do it, I’m all for that. Efficient, fast and accurate.
LASER SCANNING
Q: What about the physical world, though? You mentioned Laser Scanning.
Ron: There are two great methods to take something that is already designed—a physical item—and be able to convert that into a 3D model. One method is a laser scanner, an absolutely amazing device that’s available for as little as $1,000.00 but, typically, more like $5,000.00 – $20,000.00 for one that’s very good—and accurate. The $1,000 models are not bad. The $3,000 models are good. From there, you start getting up into models that are very good.
PHOTOGAMMETRY
There’s another version called Photogammetry. I like that option. Photogammetry is not as accurate but you can come very close to a perfect design and then go through and edit it. You can even get a photogammetry application built into your cell phone. So anybody with a cell phone can actually have a scanning system that provides really good quality scans for minimal money (e.g., $30 to get lifetime software) and the price of paper to print the grid. Then you can manipulate the output. For example, I recently viewed a video about someone who had a knob on their guitar they wanted to replace and couldn’t find one. They removed one of the other knobs, scanned it, printed it and installed it; it worked perfectly. For about $30 plus a nickle of materials and an hour of his time, he got a new knob on his guitar. Not bad.
MEDICAL APPLICATIONS
Q: On the dental side of things, they have a new 3D camera to make braces for people…
Ron: I just watched a 15-year-old kid who printed all of his own dental work, which I wouldn’t necessarily recommend—and it cost him less than fifty-cents for each piece. So, he spent less than $12.00 to fix his own teeth.
C: Compare that to $10,000.00!
C: Yes, but you can’t source one of those [dental] scanners for less than $30,000.00.
C: The idea I had was to print the spacing and then use an intra-oral camera for about $100, and then be able to take the camera sides out and mount it into the scanner. All that needs to be done inside the software is to calibrate it because they have to be a certain distance apart for the stereoscopic output. The process only takes a few seconds to scan the mouth, set up all the images and stitch them together. Then they send the output to the dental technician.
THE DEMO PRINT JOB; STATUS
Q: How’s the printing job coming along?
Ron: It actually just finished.
C: So, while we’ve been talking, Ron and Devon have been printing and now we can see the result—after only about 30 minutes.
Ron: I’ve never printed this before; it’s a first-time print. This is a multi-tool for a key chain.
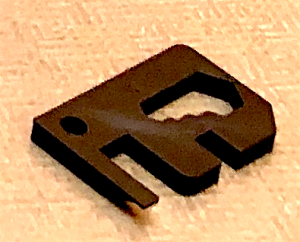
Q: Oh! Very cool. Can you print keys?
Ron: Yes. I’ve never tried it but I’ve seen it done. You can also print 3D key holders that are like a Swiss Army Knife. There’s also a way to combined products printed via FDM and Resin methods; use FDM to create a mold for the resin printing. Local businesses have used this method to create molds for specialty soaps and business logos.
INTEGRATING ADDITIONAL PARTS
Q: How easy is it to integrate other parts into the print? Metal? Copper? Neoprene?
Ron: Somebody just showed me how they’re integrating magnets into the print. All you do is pause the print—you can set up a pause in the software—add something into the print output and press resume to complete the project.
Q: You can just design the void right into it?
Ron: Yes. It will go right into it.
Q: So, say you have a metal rod for support, do you have to wait for a certain point and then add the metal support rod? How versatile is it?
Ron: In the software, it will tell you where you need to stop and, when that time comes, it will stop and move the nozzle out of the way so you can drop the object into the print and be able to resume printing from that point. We’ve done that with ball bearings, I’ve seen someone do that with a magnet, and I saw someone add plastic coating around a metal rod. It’s all about the design aspect.
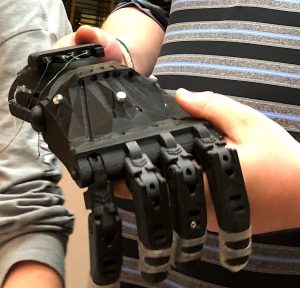
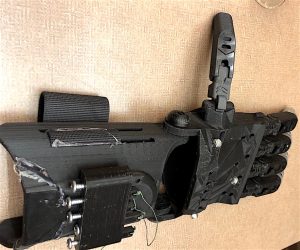
THE HAND
Ron: This product is very exciting. This is getting into the medical field. We’ve had the opportunity to be part of some projects in the medical field. We are one step away from being certified to produce prosthetic limbs. This will eventually have a motorized aspect to it. There are ways to print 3D splints. We also had a doctor come in with a surgical tool they needed to modify. He had only 20 minutes between surgeries to be able to take it out of the hospital, bring the device into our studio, let us take photographs, print a quick sketch of it, and get it back for sanitization before surgery. The tool is designed for someone who has a herniated disc. They cut a hole in the side and they’re able to run this device up through the backbone and pop-out the bad disc. Pretty cool. They needed a model to show the patient what the tool looked like, as well as interns, because you can’t use that device for a demo because it’s constantly in use. But they also needed a modification to the tool. We were able to go through, modify it, print a new replica, and they then sent it out to be cast and then we printed another one for them to show as the display.
Q: What material did you use on that project?
Ron: We used standard PLA because they were going to go ahead and cast it for use in surgery. This demonstrates the process of using an existing item and be able to make it new, with custom features, so it fits your current needs.
CLEANING UP THE FINISHED PRODUCT
Q: Have you seen any kind of edge process to remove the grooves?
Ron: Yes. That’s a standard thing that happens during the 3D printing. There are three things you can do to remediate this issue: 1) sand it; 2) there’s a material called Easy XTC that’s a self-leveling resin that you can paint over and then clean the edges; 3) you can print in ABS and put the finished product inside of a tent with an open bottle of acetone, and the fumes alone will remove the layer lines in the object. The latter, called an acetone bath, is a great process if you’re going to be casting and you want extra-fine detail.
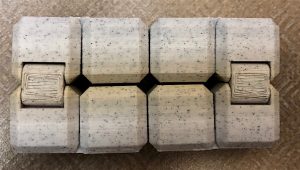
INFINITY CUBE
Ron presented an Infinity Cube that is completely printed—and operationally the same as a Rubik’s Cube—in one print process. It’s a comfort object.
He also showed some gears that were printed in one print process. The small gear example took about 15 minutes to print.
The printer we use is accurate within 20-30 microns [micron = 1,000,000th of an inch]. There’s another printer that we sell that costs around $3,000.00 and I refuse to sell it; it’s about $3,000 worth of junk. Just because it’s a name doesn’t mean that it’s good. We bought it specifically because all the school systems use this particular printer and we wanted something the kids feel comfortable with. I later changed my mind on this decision because I want them to be comfortable with something that’s going to be affordable to them and very easy to use. The difference is: the $300 model is accurate to 20-30 microns. The MakerBot Replicator One ($3000.00) is accurate to 50-100 microns. So there’s a big discrepancy there. With the $300 model, you print directly on the print bed. With the MakerBot model, you must print on what’s called a raft which lays down a base layer on which you print your object; the end result is that it’s not very clean when you take it off the print bed. Waste of materials.
SEMINARS
Q: Are you offering any kind of seminars or gatherings at your studio?
Ron: Yes. We host free events where people can come in and learn about the technology. We also have a [tech] group that builds models and hold brainstorming sessions to critique each others’ work and share that information. We also do classes on how to design; cost is $10. During the class, we teach 2-3 functions to be able to utilize the software, and then we print whatever you design.
CHARGING MODEL
Q: What’s your charging model?
Ron: We charge $5.00 per hour, based off what is on the slicing software. We give discounts for bulk projects and other things like partnerships. People send (or email) us a model and we provide an estimate of the overall charges. Other companies that provide services online are charging about $20/hour, plus a setup fee.
For custom designs, we charge $20/hour and I’m really fast, so most projects cost $20-40 for the design phase.
TYPES OF COMPUTERS USED IN 3D PRINTING
Q: What kind of computers do you use? Laptops?
Ron: I typically use a laptop. The software does not take up much space or use too much computing power. Some of the higher-end software can take up a bit more space, when it comes to eating-up the RAM but overall, it’s fairly minimal.
Q: Is that [demo printer job] running on a Raspberry Pi?
Ron: No. In this case, it’s already been pre-sliced, it’s on the SD Card and never has to touch a computer again. At home, I have a Raspberry Pi that I have integrated into this [printer] so when I’m on my laptop, I can simply send the design to it and then, on my cell phone, I have a web cam set up so I can monitor everything from my cell phone. If I have a problem, I can kill the print. I also have the process to auto-record the print process, and I take those and issue promotional videos to post in the Internet. Or, if somebody wants to see their custom print being printed, I can email them the file and they can watch it printing. For time-lapse, I have two different types of time-lapse processes: One which moves very quickly and you can see all the action; and another which shows the object rising up out of the bottom of the plate. And I keep a little clock on the side so you can see how fast the process is. That’s my geekiness.
RON’S BACKGROUND
Q: What is your background?
Ron: I was with Radio Shack for ten years before the company went bankrupt. I was a Regional Manager and absolutely loved it. It was a lot of fun. I had all the stores in Northern California. They went under and then I was starting-up this business here for 3D printing, and I simply love tech, so I reached-out to my old Radio Shack partners after the company went bankrupt, I was able to hook-up with them, so we’re actually a Radio Shack Franchise and sell Radio Shack electronic components. The reason I did that is because electronic components and 3D printing really go hand-in-hand. 3D printing is amazing, electronics is amazing but you can marry the two together and be able to build anything you want!
We teach a lot of kids—and adults—robotics classes, engineering classes, and show them how to get inspired and print 3D objects. That’s how I got started … I absolutely love tech. I’ve always been the guy everyone approaches to learn how to use tech. 3D printing is incredible easy now; it’s become really good—and it’s going to get better.
NEW TYPES OF PRINTERS IN DEVELOPMENT
There’s a new printer being developed that oscillates instead of the current fixed style. The hope is that this new printer will be available within a couple of years. This was made possible because a couple of high school students wanted to develop freeware to post online for download that will go through and, instead of 3D printing a model like you typically would, where it starts from the bottom and goes up to the top, they had wings for an airplane with support material on the inside and then goes outside afterwards and prints the shell of the wing. So they developed that software that is now being utilized in some of the test printers that are being manufactured.
MILK-BASED RESIN PRINTERS
There are also some resin printers they are using that are milk-based; they have multiple colors inside and, based on the wavelength of the UV light, will be what color will be pulled out of it. Those are in test right now.
DEVON’S PROJECTS
Q: Devon, why don’t you tell us what you’ve been printing?
Devon [Ron’s 9-year-old son—and Assistant]: I do all sorts of stuff. I’ve been working on something for my Long [skate] Board because I like to ride it to school. I made fenders so I can ride it in the rain. When the ground is wet, I can ride it without getting the ground water on my clothes. The fenders, just like on a car, stop the water from splashing all over the rider.
C: Great! Patent it. Go on Shark Tank!
Ron: Devon also prints a lot of stuff for his pond [Devon is interested in reptiles.] and his dogs; all sorts of stuff. Earlier, I relayed to a couple of people that we had a part on our sprinkler system that broke and my father-in-law was going to drive to Home Depot to pick up a replacement part; that would have taken an hour-plus simply to get the part and come back home. I was able to print two parts in an hour; he took the replacement part out and popped it on the sprinkler system and it worked. In less time than it would have taken for a round-trip to Home Depot.
REPLACEMENT PARTS
Q: Did you start with a scan?
Ron: I didn’t even need to do that. I went on to ThingyVerse.com and discovered that someone already designed the part. I downloaded the file, I clicked Print and, with 30 minutes each, I printed his replacement part and a second, spare one for me. This probably cost me about ten- or twenty-cents total, in materials.
C: If you go to McMasterCarr, which is an industrial parts source, they have parts for cars. They offer 3D models for every part they carry. You can’t resell them, but you can 3D print them. So every pipe and fitting you can think of, they have it on their website.
Ron: That’s what I love about the 3D Printing World: Everybody shares everything. You’re able to take a model, even if you don’t have something exact, if you find something that’s close, you can modify it to get what you need.
STORM TROOPER GEAR
Q: Which printer is big enough to print a Storm Trooper Outfit?
Ron: Good question! We actually print a lot of helmets. There are two methods for being able to print helmets: 1) you can split the helmet in half and print it in two different parts (the slicing software will automatically slice it into the two sections you need and then glue the two pieces together; and 2) you get a printer that has a big-enough space; we use a Creality Printer with a bed that is 12”x12”x16”, and we maneuver it around to get what we need. We are actually in the process of developing our own 3D printer that we plan on manufacturing ourselves, for our iPrint 3D Studio. I love making Cigar Box Guitars. I 3D print all the parts for them. I also 3D print entire ukuleles; the neck, the body, everything. I love music. I love instruments. My dream is to print an entire guitar body. I’ll use the neck wood and everything. I’m building a printer that’s capable of printing everything I want to print. So, I’m going to print both electric and acoustic guitar bodies. The reason I want to do that is: it opens it up for all kinds of styles, and the sound of them is very unique; especially for the acoustic type.
PRINTING CLOTHING
Q: What about printing clothes?
Ron: Awesome. There are several different things that can be done. One is to print onto tulle material. You can actually print a couple of layers and then turn around and print on top of that and end up with some really cool designs. Then sew those together to make the final fabric product. Another thing people are doing is printing chain mail costumes. People also print things in silicone in TPE and TPU for rubber. Belts. You can actually 3D print an entire functional belt on a bed that’s about the size of the table-top printer here. You can also print shoelaces, called Klots (shoe lace adapters).
C: Terrific! Very informative. I’m sure you have a lot of customers here, who will spread the word.
THERE’S A WAY TO 3D PRINT ANYTHING!
Ron: I hope that what you take away from this Tech Talk is that, no matter what you need, there’s a way to 3D print that! We have customers who are into baking; they customize cookie cutters, cake toppers, other objects. We have people who are into gardening and want to print gardening tools like the hose attachment for a sprinkler. People who are into cars; you can 3D print parts for cars. Whatever your hobby is…in fact, we had someone come in who’s into knitting and said, “there’s no way you’ll have anything for me,” and I replied, “watch me!” We ended up printing them new bobbins for them because they liked to spin their own wool, and they can’t find specialized bobbins. Guess what? I found it. I printed it for them, and they’re happy!
BIO PRINTING
Q: Are you into bio printing yet?
Ron: Really interesting. There are physicians who are 3D printing organs that have successfully been transplanted into animals, and have plans to transplant organs into humans very soon. They’re also 3D printing bone; replacement bone. I saw someone 3D print a nose. A new jawbone.
Q: Some I happen to know has lost part of their index finger. Is it possible to 3D print a slip-on extension for their finger?
Ron: I don’t see why we couldn’t do something like that.
C: Cool. I’ll send him in.
Ron: In fact, one of our designers who technically still works for us—remotely—successfully 3D printed a prosthetic attachment for a thumb for someone who lost their thumb in a war and wanted to be able to play Xbox, where you can’t do anything without a thumb. The prosthetic was attached to the paddle that can then be controlled by the palm of his hand.
If there’s a problem, there’s a solution when it comes to 3D Printing.
From a veterinarian standpoint, we’ve had some people come in to print 3D parts for animal wheel chairs.
3D PRINTING FOOD
Q: Meat? Food?
Ron: They are 3D printing food. Most of the five-star restaurants have machines that will decorate the plate. You can also print chocolate, gummies, most candies, into whatever shape you desire. You can also print 3D designs on cookies and cakes. Then there’s a home printer that takes your own food that you puree and prints it into some shape for fancy dinner parties.
EDUCATIONAL RESOURCES
Q: Do you have any kind of a website, like YesWeCan.com that lists all these different things that you’ve done?
Ron: That’s something we’re implementing on our Facebook Page. In fact, NASA has a 3D print shop that they are using to print stuff to send to Mars to be able to 3D print the buildings there, using the local red clay.
3D PRINTED HOUSES
3D printed houses are happening right now that use an extruder to send the concrete down the line. They’re able to get any design they want. They’re able to get a very functional home in a very quick amount of time that is very durable, able to withstand earthquakes, and is very well insulated. There’s also somebody who just 3D printed almost an entire car. I also know of someone who used a 3D printer smaller than our table-top printer to print an entire kayak; they printed all the parts and bolted them together.
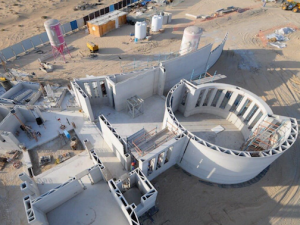
LARGEST 3D-PRINTED STRUCTURE IN THE WORLD–IN DUBAI
3 Workers, 1 Printer produced this structure! More photos and information at link, above.
IDENTOGO RESOURCE
On a side note: Ron’s company has recently integrated IdentoGo into their business, so for those people who hate going through the TSA process, they can provide all the background checking you need to effortlessly-pass-through this process. Exclusive to Southern Oregon. Identogo is basically a pre-check process that allows you to go through the gate without removing articles of clothing (belt, shoes, pat-downs), and go through a quick line. You become a known traveler at that time. TSA Pre-check.
FOR MORE INFORMATION…
For more information on Ron’s business, you are invited to visit his studio in the Rogue Valley Mall, second floor, outside Kohl’s Department Store.
Author: Karen
Written: 12/6/19
Published: 12/25/19
Copyright © 2019, FPP, LLC. All rights reserved.